Here is a very helpful video for Windows Vista users. You can just continue to read through the article and/or if something doesn’t make sense, just watch the video below for a clear demonstration with instructions on how to enable Multiple Monitors on your computer, but will most likely (but not absolutely) need at least one if not more Multi Monitor Video Card.
Windows XP Users:
As a side note, you should be aware that in a Multi Monitor Setup one of the monitorswill serve as the primary monitor which will display the login dialog upon start up of your pc. Most all of the items you open will default to the primary monitor. One of the greatest things is that you can actually select completely different resolutions for each screen as well as adjust the color settings individually. To connect up your Multiple Monitor System you will need additional video outlets or one (or more) of the easy to use and truly a no brain-er "so easy a caveman can do it" Multi-Monitor Adapters offered by the company that brings us the productivity machine that is gaining steam as an authority and known worldwide as Super PC. It's the type of simple yet dependable Multiple Monitor video adapter that will allow you to take full advantage of the awesome productivity gains you would expect to get when using a Multi-Screen solution without the daunting need to install expensive, over-rated, over-priced, off the chain and unnecessary multiple monitor software.
Configuration Step: Here we go!
1) Go to START -> CONTROL PANEL
2) Select APPEARANCE AND THEMES -> DISPAY
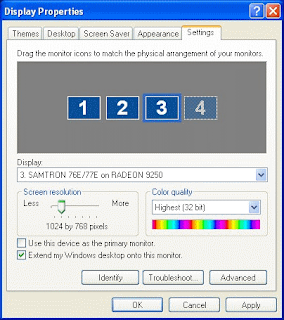
3) Select the SETTINGS TAB and click IDENTIFY which will display a large number on each of the monitors. This shows which monitor is going to correspond with each icon.
4) Click the icons and drag them to the real world position in which the monitors are set up.
Click APPLY or OK

That’s almost just about it, your screen will most likely flash and Windows may ask you if you’d like to keep the settings and if all is well and everything looks good, then go ahead and hit OK. Viola! You now have a Multi Screen / Multi Monitors to work with. Enjoy!
To change the primary monitor in Windows XP you can do the following:
Steps:
1) In SETTINGS TAB of the Display Properties Dialog box, click once on the monitor icon that you would like to make the primary monitor.
2) Click to select the USE THIS DEVICE AS PRIMARY MONITOR check box. This box will not be available if you select the monitor that is already your primary monitor.
Windows Vista Users
Note: Windows Vista is designed to be a little more user friendly. When I plug in my additional monitor, Windows automatically sets it up for me, MOST OF THE TIME. So, I’ve included these directions for the times when Windows is unable to set up your monitor on its own. Also, as mentioned above, I’ve included a short video for the Vista setup, just in case you have trouble finding anything.
Configuration Step:
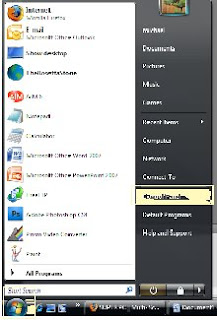
1) Go to the START button (actually, it’s the circular Window logo in the bottom left hand corner of the screen on most Vista desktops.)

2) Select CONTROL PANEL from the right hand column.
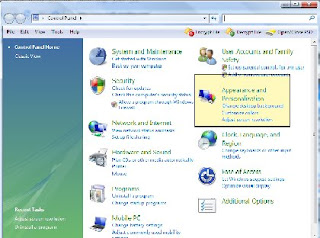
3) If you are in Classic View, then select CONTROL PANEL HOME.
4) Under the Appearance and Personalization, click ADJUST SCREEN RESOLUTION

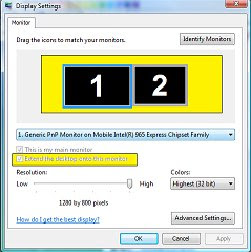
5) Now you should see two or more black boxes if you’ve already connected your additional monitor. The icons are representations of the real world position of your monitors. You can drag and drop the icons so that they accurately represent where your multiple monitors are located on your desk.

6) Now select the additional monitor by click the icon and make sure the check box below that says, "Extend the desktop onto this monitor" is selected, then click APPLY. Once complete, this process will enable your Multiple Monitor Setup to perform seamlessly and allow you to navigate through all monitors.
7) You may see the screen flash, and the desktop should now be extended to show Dual Screens. You should get a little pop up that asks if you’d like to keep these settings. If everything looks good, click OK. If something isn’t right, click CANCEL button and try one more time from the top.
There you go! Just about everything you need to know to setup your Multiple Monitor Display. Now you can finally paste that old black lab lounging peacefully on the old wood porch (like great Grandpa had in the Ozarks of MO) as a Dual Monitor Wallpaper. Or you can even go a step further than that. It all depends on the individual as to what type of Dual Monitor Backgrounds he or she may or may not use. In a world that strives to be politically correct, it's good to know that there's a Multi-Monitor Display on your desk to show all the different colours of diversity simultaneously!


